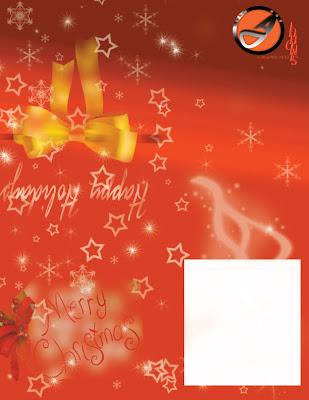
 Work-flow for Christmas Card. By: Jorge Sinohui, Period 1, Computer Art
Open Adobe Photo-shop 7.0, and go to File and click on New and name it Christmas Card.
Make sure it is a CMYK type, and it has to be 8.5 inches by 11 inches.
Then click OK, and then put a color red on the background of the layer.
Create a new layer and download new brushes off the Internet, and they are stars and snow flakes.
To download these brushes you have to save them to your documents and open them in photo-shop.
Go to the brush tool, and go to load brushes and then open the brush there and you will have the stars and snowflakes brushes to use.
After you have the new brushes, go to Brushes which is at the right corner next to File Browser, and make the spacing 300% and then click out of that option and then start stamping the stars or snowflakes onto the layer.
After make a straight line using the Pen Tool, and then put a layer mask and lightly reveal it with the brush tool.
Then put a gold ribbon on top of that line and like the line, add a layer mask on the ribbon, and also lightly reveal it with the brush tool.
Make sure that the ribbon is at the top left corner flipped up-side down because this is going to be a printed flip card.
After create a new layer, and using the text tool type in the words "Happy Holidays" and make the font pretty noticeable and put the color white, and also put a layer mask on it and reveal it lightly with the brush tool.
Place the "Happy Holidays" layer on top of the ribbon. (Remember it has to be upside down.)
Next get a Christmas tag for presents that says "Merry Christmas" or blank if you want to do it hand-written. Put it under the ribbon and the text "Happy Holidays", and this is not upside down.
Add a layer mask to the Christmas tag, and with the brush tool lightly reveal it. and calculate how big it has to be because you don't want it to go over the middle.
If you have a logo for yourself, make sure you put it at the right hand corner of your card, and put it upside down.
Next put a text box at the bottom right hand corner, and make it big enough to not go over the middle, but big enough to write in it.
Using the rectangular tool, make a box, and color it in white, and free transform it to adjust it to the right size you need it.
After all this, you should have your Christmas card done, and ready to give to someone on this special day.
No comments:
Post a Comment